The Volumes area of Server Backup Manager allows you to work with the containers, or "volumes," in which your Disk Safes are stored. Click Volumes in the Main Menu to open this page. You also can access the Volumes area directly by appending the /Volume/ folder to the Backup Manager address in your Web browser address bar, such as http://10.61.200.31/Volume/. Note that the address is case sensitive.
The Volumes window includes the following areas:
- Volumes menu. Provides access to the actions that relate to managing volumes and customizing the volumes list.
- Volumes list. Provides a list of volumes, their settings, and available functions, such as editing, removing, or deleting the volume.
- Details pane. Provides additional details for the volume selected in the list.
- Main menu. Provides simple, one-step navigation to other areas of Server Backup Manager.
The following image highlights the different areas of the Volumes window.

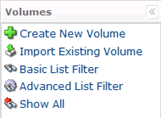
Using the Volumes menu
The following Volumes menu buttons are available:
- Create New Volume. Add a new volume to the system. After clicking this button, you can define new volume properties including associated groups and users. For more information about creating a new volume, see Create volumes.
- Import Existing Volume. Import a volume. Use this option to copy or move a volume folder within this server or from another server. For more information about importing volumes, see Import existing volumes.
- Basic List Filter. Customize the view of the Volumes list by applying the minimum range (most commonly used) of filter criteria. For more information about filtering the Volumes list, see Customize the Volumes list.
- Advanced List Filter. Further customize the view of the Volumes list by applying all possible filter criteria. For more information about filtering the Volumes list, see Customize the Volumes list.
- Show All. (Visible only when a filter is applied) Cancels filter settings and shows all records in the Volumes list. For more information about using the volumes list view, see Customize the Volumes list.
Using the Volumes list
The Volumes list provides information about Volumes in grid format.

Understanding the Volumes list columns
- Name. Displays the name used to identify the volume in the system. For example, to assign a volume to the Disk Safe, select a volume name from the drop-down menu.
- Description. Displays any additional information describing the volume.
- Volume Path. Displays the absolute path to the directory where the volume resides. For example: c:\main_volume,/volume1.
- Quota Type. Displays an icon representing the quota type for the volume. Set a quota to limit the disk usage of the volume. Available quota types include On Disk Size and Size of Deltas in Disk Safe. For more information about volume quota types, see Create volumes.
- Soft Quota. Displays the value, in bytes (i.e. KB, MB, GB, or TB), of the warning level where users are informed that they are close to reaching their effective limit.
- Hard Quota. Displays the value in, bytes (i.e. KB, MB, GB, or TB), of the maximum resources allowed to be occupied by data.
- On Disk Size. Displays the value, in bytes, of the disk space occupied by the volume.
- Deltas. Displays the value, in bytes, of the data that changed since running the most recent backup.
- Disk Safes. Displays the total number of assigned Disk Safes. You can assign Disk Safes to the volume in the Volume properties window while creating or editing the volume. The Volume properties window also displays the list of assigned Disk Safes.
- Groups. Displays the total number of assigned groups. You can assign groups to the volume in the Volume properties window while creating or editing the volume. The Volume properties window also displays the list of assigned groups.
- Users. Displays the total number of assigned users. You can assign users to the volume in the Volume properties window while creating or editing the volume. The Volume properties window also displays the list of assigned users.
- Actions. Displays icons that provide access to the following actions over the corresponding volume:
- Edit. Access the Volume properties window in order to change properties.
- Remove. Remove the selected volume from the list. The volume data is left on the disk.
- Delete. Delete the selected volume from the system.
Page navigation
The Page Navigation pane displays below the list and can be used to divide the volumes into pages by specifying the desired number of items per page. Various buttons can be used to navigate from one page to another.
- Arrows. Click one of the following Arrow buttons to move forward and backward through the pages:
- First. Go to the first page.
- Previous. Go to the previous page.
- Next. Go to the next page.
- Last. Go to the last page.
- Page number. Allows you to type the specific page number or range of pages you want to view. Press *Enter *to go to the required page. SBM displays the total number of existing pages in the pane.
- Items Per Page. Allows you to type the number of items to display per page in the Volumes list. The system retains your settings. SBM displays 10 items per page by default. If you want to see a different number of items per page, enter the appropriate number, and then press Enter. The maximum number of items per page is 25.
Details pane
This pane provides detailed information about the volume selected in the Volumes list. Most of the presented data is the same as the data shown in the Volume list columns.
Settings tab
- GUID. Displays a unique ID for the volume.
- Name. Displays the name of the selected volume.
- Description. Displays a description of the volume, if available. The description is defined during Volume creation and is used to identify the selected volume in the list.
- Volume Path. Displays the path where the volume is physically located. For example: c:\main_volume, /volume1.
Disk Safes tab
Displays the list of Disk Safes assigned to the selected volume. You can create a new Disk Safe, edit a Disk Safe, vacuum a Disk Safe, and open, close, and attach/detach a Disk Safe from this tab.
Groups tab
Displays the list of groups assigned to the selected volume. You must edit the volume to add or delete groups.
Users tab
Displays the list of users assigned to the selected volume. You must edit the volume to add or delete users.
Replication tab
Displays the replication settings of the selected volume. On the Replication tab on the Edit Volume window, select the Enable replication check box, and then type the replication path and desired action to enable replication on this volume. Clear this check box to stop or disable replication.
When you enable replication, SBM allows you to type the Replication Path associated with the action you want SBM to take. Select one of the following options:
- Execute script. Select this option to back up your data using the replication script entered in the available field.
- Replication Script. Note that scripts you want SBM to execute after replication should be placed in the '/usr/sbin/r1soft/bin/scripts' directory
- Amazon Glacier. Select this option to back up your data to the cloud using Amazon Glacier.
- Vault. Type the name of the container where you want to store archives.
- End Point. Type the URL that is the entry point for a web service.
- Access Key. Type the access key to your Amazon Web Services account. You can find this key on the AWS Console at https://console.aws.amazon.com/iam/home?#security_credential.
- Secret Key. Type the security key to your Amazon Web Services account. you can find this key on the AWS Console at https://console.aws.amazon.com/iam/home?#security_credential.
Limits tab
Displays the quotas, data retention rules, and permission settings for the selected volume.
- Database Backups
- Replication Limit
Data Retention
- Recovery Point Limit
- Archive Point Limit
Quotas
- Quota Type. Quotas are set to limit the disk usage of the Volume. It can be "On Disk Size" or "Size of Deltas in Disk Safe." See the detailed description in Create volumes.
- Soft Quota. The value in bytes, KB, MB, GB or TB. Soft Quota is a warning level where users are informed that they are close to reaching their effective limit.
- Hard Quota. The value in bytes, KB, MB, GB or TB. Maximum resources allowed to be occupied by data.
Statistics tab
- On Disk Size. Shows the disk space occupied by the Volume.
- Deltas. Deltas are the data that has changed since the last backup run.
- Disk Safes. The number of assigned Disk Safes.
- Groups. Number of assigned Groups. Groups can be assigned to the Volume in the Volume properties window during creating or editing of the Volume. You can see the list of assigned Groups in the Volume properties window.
- Users. Number of assigned Users. Users can be assigned to the Volume in the Volume properties window during the creation or editing of the Volume. You can see the list of assigned Users in the Volume properties window.