With Server Backup Manager, you can store and archive Virtual Full Backup replicas onto any disk-based storage and Network Shares.
| Note You can only use NAS appliances that support NFS locking; this includes most commercial-grade NAS appliances, but not all. |
This article will provide instructions on how to store Disk Safes on a Windows Network (CIFS) Share.
Creating a Windows Network Share
| Reference: CIFS CIFS (Common Internet File System) is a protocol that defines a standard for remote file access. CIFS is used to provide shared access to files, printers, serial ports, communications between nodes on a network, etc. CIFS are mostly run on Windows. |
For instructions on network sharing, refer to: Windows File Sharing (SMB/SAMBA/CIFS) (external link).
Creating a Disk Safe
While creating a Disk Safe, specify a Windows Network Share in the Path field. The share must be available for the user account under which the Backup Manager is running.
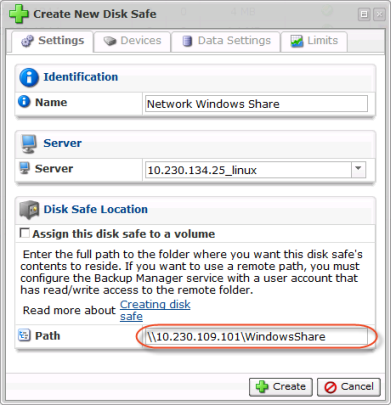
| Notice Windows network share should always be specified using a UNC style path (e.g. \\server\share\folder) convention. |
| Reference: UNC UNC is an abbreviation for Universal Naming Convention which implies that a network share can be addressed according to the following: \\ServerComputerName\ShareName where ServerComputerName is the WINS name, DNS name, or IP address of the server computer, and ShareName may be a folder or file name, or its path. |
| Notice The target share directory must be empty. The Disk Safe cannot be created in a folder that is not empty. |
See also Create Disk Safes.
Creating a Policy
While creating a Policy, select the Disk Safe linked to the network share.

See also: Create policies.
Closing and Detaching the Disk Safe
You can close the Disk Safe located on a network share as usual. See Close Disk Safes.

The closed Disk Safe can be detached as usual. See Detach Disk Safes.

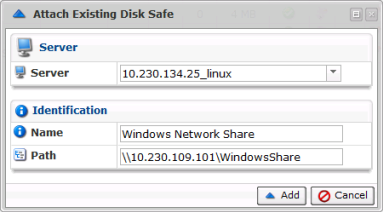
Attaching Existing Disk Safe
You can attach an existing Disk Safe located in a Network Share. Define the path in UNC format. See Attach Disk Safes.