The following example demonstrates how to add a server, create a Disk Safe, and a policy.
A PHP file called SelfManaged.php can be found here:
- for Windows: <installdir>\apisamples
- for Linux: <installdir>/apisamples
Read more in Access example API functions.
Sequence of Automated Actions
The following steps can be accomplished by using this script:
- Add a server. The server is the server or PC you want to back up. Read more in Protected Machines.
- Create a Disk Safe. This is the storage location of the backed-up data. Read more in Disk Safes.
- Create a policy. This is the task which configures the backup. Read more in Policies.
How to Fulfill Appropriate Actions in the Server Backup User Interface
Below, you can find the steps to take in the program user interface in order to perform the same actions as the script. See the accompanying screen-shots illustrating the scripts for every step.
First Step
Create a Backup Agent
1. Click Servers in the Main Menu. Server Backup Manager displays the Servers page.
2. In the Servers menu, click Add Server, as displayed in the following image.
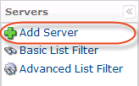
SBM displays the Create New Agent window.
3. Define the following options:
- Server Name. Type a name for the server. SBM displays this name in the Servers list.
- Host Name/IP. Type the host name or IP address of the server.
- Port Number. Type the number of the port through which you want to connect to the server, if different from the default value (1167).
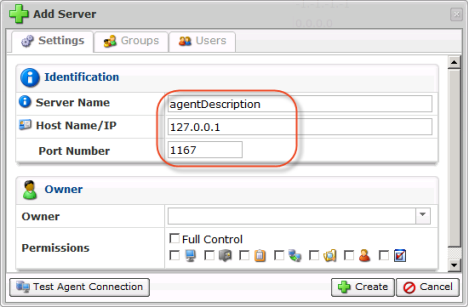
4. Click Create.
5. Once SBM displays the message that you successfully added the server, click OK to close the window.
For more information about adding a server using the Server Backup Manager Web interface, see Add Protected Machines to Backup Manager.
Create a Disk Safe
1. Click Disk Safes in the Main Menu. Server Backup Manager displays the Disk Safes page.
2. In the Disk Safes menu, click Create New Disk Safe, as displayed in the following image.
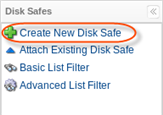
SBM displays the Disk Safe Best Practices window, as shown in the following image.
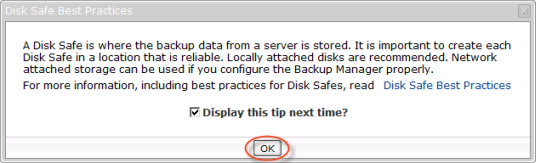
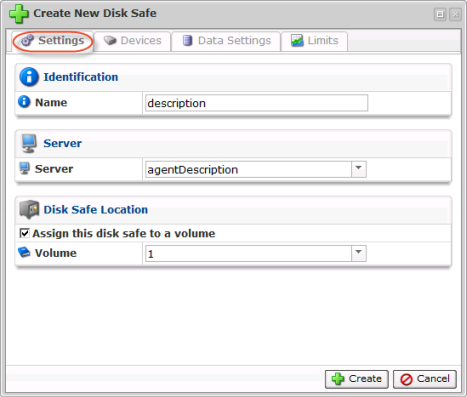
3. Read the available information, and then click OK to close the window. If you do not want to see this same message each time you create a new Disk Safe, check Display this tip next time before clicking OK to continue. SBM displays the Create New Disk Safe window.
4. Define the following options:
Settings Tab
- Name. Type the name for the Disk Safe. SBM displays this name in the Disk Safe list.
- Server. Select the name of the server on which the Disk Safe will exist.
- Path. Location where the Disk Safe resides.
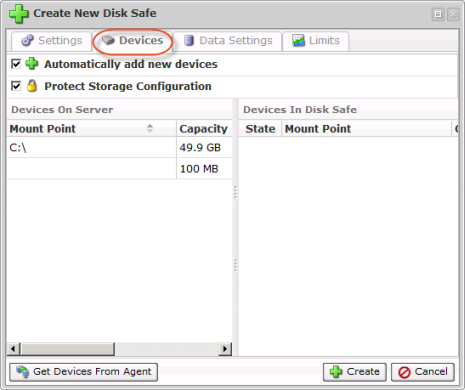
You can also enable the following options in the corresponding check-boxes: - Automatically add new devices. Indicates whether you want to automatically add all available devices to the Disk Safe.
- Protect Storage Configuration. Indicates whether you want to back up partition tables.
- Backup Windows System Reserved and Unmounted Partitions. Indicates whether you want to back up a hidden Windows system partition.
Devices tab
- Automatically add new devices. Indicates whether you want to automatically add all available devices to the Disk Safe. Clear this checkbox to select the devices you want to add to the Disk Safe. If you do not select this option, then SBM displays the message, "At least one device must be enabled for replication," when you attempt to save the Disk Safe. For more information about devices, see Access devices and Add devices.
- Protect Storage Configuration. Indicates whether you want to back up partition tables.
- Devices on Server pane. This pane provides you with information about devices that currently exist on the host server. Click Get Devices From Agent to view the list of devices on your Backup Agent server. For more information about devices, see Access devices.
- Devices In Disk Safe pane. This pane provides you with information about devices that are currently assigned to the Disk Safe. For more information about devices, see Access devices.
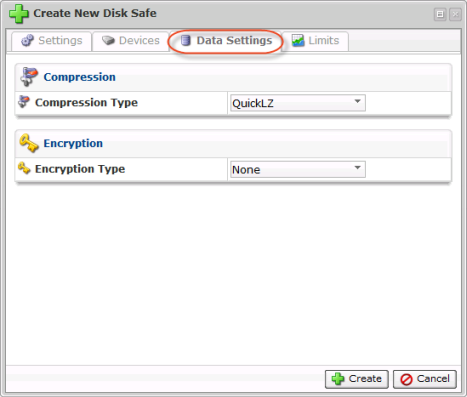
Data Settings Tab
- Compression Type. Select the compression level for the Disk Safe.
- Encryption Type. Select the encryption type for the Disk Safe. If you choose to encrypt a Disk Safe, SBM prompts you to create a password. You must supply that password to browse files, browse control panel users, browse databases, and initiate a bare-metal restore. For more information about your Disk Safe encryption, see Manage Disk Safe encryption.
Limits tab
The Limits tab allows file excludes, recovery point archiving, and control panels that you want to enable or disable. You can define a limit for your replication, recovery points, and archive points.
| Tip When you assign a Disk Safe to a volume, all the volume limits are applied to that Disk Safe. for this reason, the Disk Safe limits should be at least as restrictive as the volume. For example, if a volume has a recovery point limit set to 100, the Disk Safe can only contain 100 recovery points or less. |
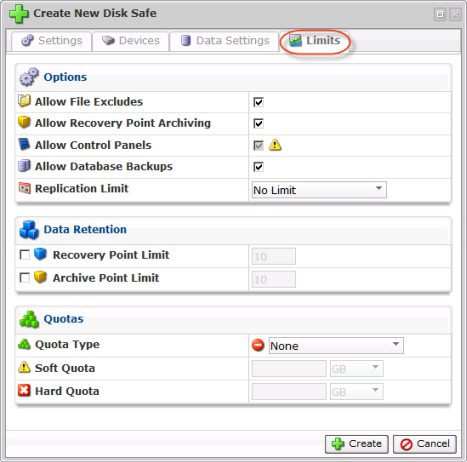
Options
- Allow File Excludes. This option is selected by default. Activates the File Excludes feature for the Disk Safe. If you check this option, then the system allows you to specify the files and folders that you do not want to back up during the replication policy. By default, SBM replicates all file and folders from the selected devices. For more information about excluding files and folders, see About exclusions and Exclude files and folders.

You cannot activate this option if it is not activated for the volume to which the Disk Safe belongs. - Allow Recovery Point Archiving. This option is selected by default. Activates the Archiving feature for the Disk Safe. If you check this option, then the system allows you to create archives of your data on a specified hour, day, week, or month. If the option is enabled, then you can specify the Archive Point Limit under Data Retention. For more information about archiving, see Offsite Backup and Archival.
You cannot activate this option if it is not activated for the volume to which the Disk Safe belongs. - Allow Control Panels. This option is selected by default. Activates the Control Panels feature for the Disk Safe. This option allows you to back up and restore hosting control panel user accounts. for more information about control panels, see Hosting control panels.
Tip
You cannot activate this option if it is not activated for the volume to which the Disk Safe belongs.Tip
There is a system-wide option to enable the Hosting Control Panels feature (Configuration > Product features Enable Hosting Control Panels option under Hosting Control Panels). For more information about enabling the Hosting Control Panels feature, see [Enabling Hosting Control Panels Feature]. - Allow Database Backups. This option is selected by default. This option allows you to back up and restore all databases available on the server. If clear, the SQL Server, Exchange, and MySQL tabs are disabled while creating a policy.
- Replication Limit. This option defines the lowest replication frequency for that Disk Safe. For example, if you set the replication limit to weekly, then the policy assigned to that Disk Safe can only be weekly or higher (hourly and daily replications are restricted).
Tip
The Disk Safe Replication Limit must be within the limits of the Replication Limit of the volume to which the Disk Safe is assigned.
Data Retention
- Recovery Point Limit. The maximum number of recovery points stored in the Disk Safe.
Tip
The Disk Safe Recovery Point Limit must be within the limits of the Recovery Point Limit of the volume to which the Disk Safe is assigned. - Archive Point Limit. The maximum number of archive points stored in the Disk Safe.
The Disk Safe Archive Point Limit must be within the limits of the Archive Point Limit of the volume to which the Disk Safe is assigned.
Quotas
- Quota Type. Select the type of quota assigned to the Disk Safe. Quotas are set to limit the disk usage of the Disk Safe. The limit is set on the basis of space occupied by Disk Safes or the size of deltas.
- Soft Quota. Select the value in bytes or in deltas. Soft Quota is a warning level that informs users that they are close to reaching their effective limit.
- Hard Quota. Select the value in bytes or in deltas. Hard Quota allows resources to be occupied by data. If the Hard Quota is reached, then the system forbids generation of new recovery points. The replication is interrupted and fails.
5. Click Create.
6. Once SBM displays the message that you successfully created the Disk Safe, click OK to close the window.
For more information about creating Disk Safes using the Server Backup Manager Web interface, see Create Disk Safes.
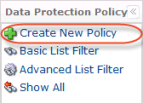
Create a policy
1. Click Policy in the Main Menu. Server Backup Manager displays the Policies window.
2. In the Policy menu, click Create New Policy.
SBM displays the Create New Policy window.
3. Define the following options:
- Enabled. Indicates whether you want to enable the policy. The enabled policy runs according to the schedule.
- Name. Type the name you want use to identify this policy among others in the Policies list.
- Description. Type the details of your policy.
- Server. Select a server whose data you are going to replicate. You then can select a Disk Safe assigned to the server.
- Disk Safe. Select a Disk Safe in which to save the replicated data.
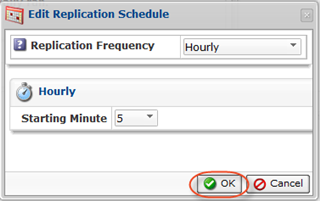
4. Click "Edit Schedule" to edit the replication schedule.

Choose "Hourly" as the Replication Frequency and "5" as the Starting Minute.

Click "OK."
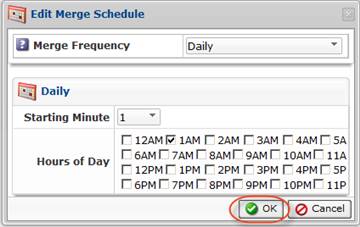
5. Click "Edit Schedule" to edit the merge schedule.

Define "Daily" as the Merge Frequency and "1" as the Starting Minute.

Click "OK."
6. Click "Create".

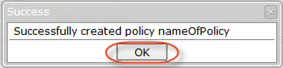
7. Click "OK" in the "Success" window.
See Create policies.