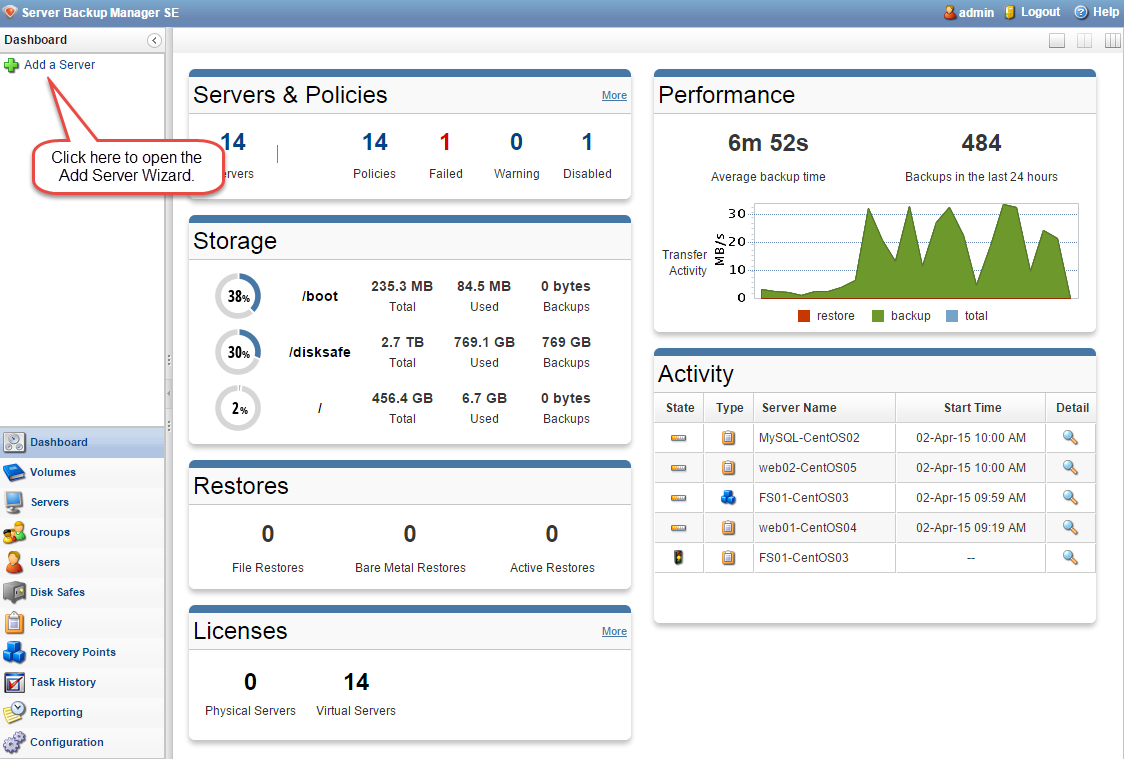
The following information describes how to quickly add a server to the backup manager so you can start a backup as soon as possible. After you log in to Server Backup Enterprise for the first time, the Add a Server button displays in the Dashboard section. Click this button to open the Add Server Wizard.
The Wizard guides you through all necessary settings across the application in order to configure a backup task for your Server. Once you have completed all of the steps in the Wizard, you will be able to start a backup task for the Server.
| Video To watch a video explaining how to quickly add a server to the Backup Manager using the Add Server Wizard, click here. |
The Add Server Wizard is designed to simplify the experience of the following:
- Adding a Server
- Installing a Backup Agent
- Creating a Volume
- Creating a Disk Safe
- Creating a Policy for the new Server
Additionally, it also reduces the flexibility given to the user in terms of the Volume, Disk Safe, and Policy settings.
| Note Advanced users can use the main application functions that provide access to the full functionality of these actions. For instructions, see the following resources: |
The Add Server Wizard is divided into four screens:
Screen 1 - Choose a Server
The first screen allows you to specify options related to the Server you are going to back up.
1. You can back up any machine available via the local network or Internet, or you can back up the Server Backup machine itself.
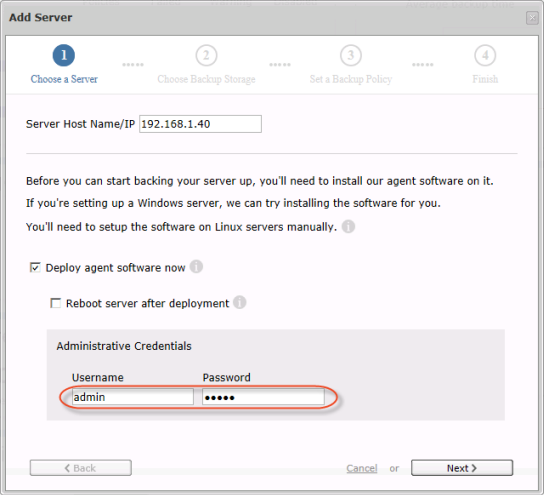
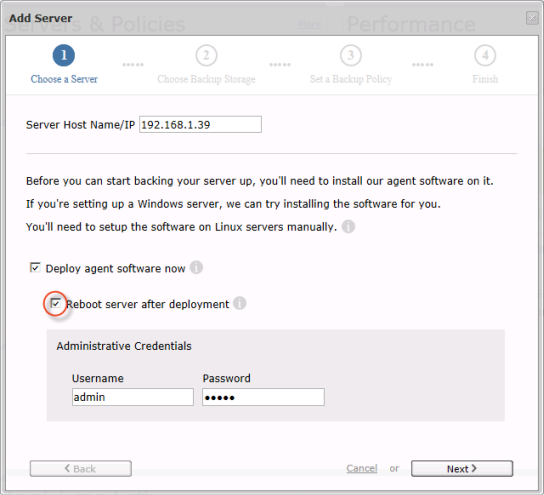
1.1 Enter the Host Name or IP for the Server you are going to back up.
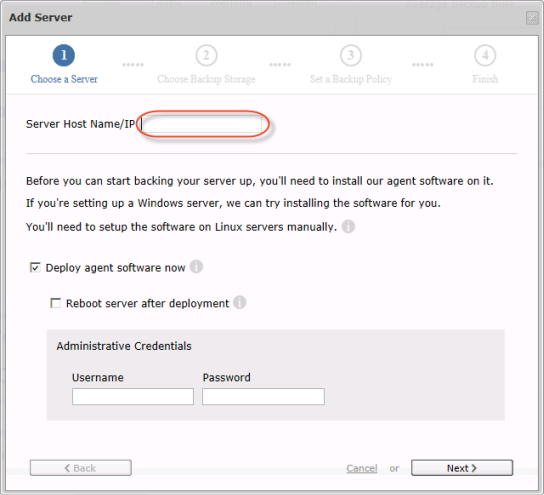
2. The Backup Agent software is required to be installed on each Server you want to back up.
2.1 Carefully read all the information displayed in this window during the process. You can also hover your mouse pointer over the information sign for additional useful information.
2.2 Make sure the Deploy agent software now check-box is selected.
| Tip You can deselect the "Deploy agent software now" check-box if you have already installed it. In this case, the "Administrative Credentials" area will disappear. |
2.3 Fill in the Username and Password fields to specify the administrator's username and password for accessing the Server and installing the Agent software.
3. By default, the "Reboot server after deployment" option is disabled. If you decide to select this option, then the Server will be rebooted at the end of the agent deployment.
| Notice No backups can take place until the reboot occurs. |
4. Click Next.

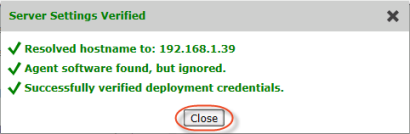
5. The verification process will start. If there are no errors, you will see the following message. Click Close to proceed.
Screen 2 - Choose Backup Storage
In this step, you choose where to store your backups and specify the compression and encryption types.
Selecting Volume Name and Location
1. Your backups will be kept on your Server Backup machine on one of the physical disks.
1.1 Choose any of the available Disks on your Server Backup machine to create a backup storage on.
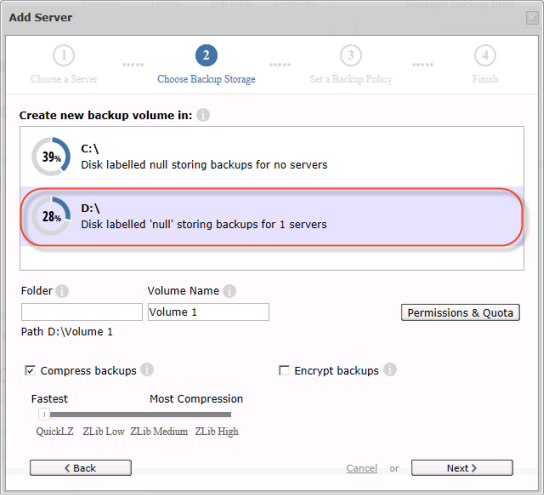
2. Volumes are containers of your backed-up data. Physically, this is a folder on your hard drive. You can leave the default options for the Volume or specify your custom ones.
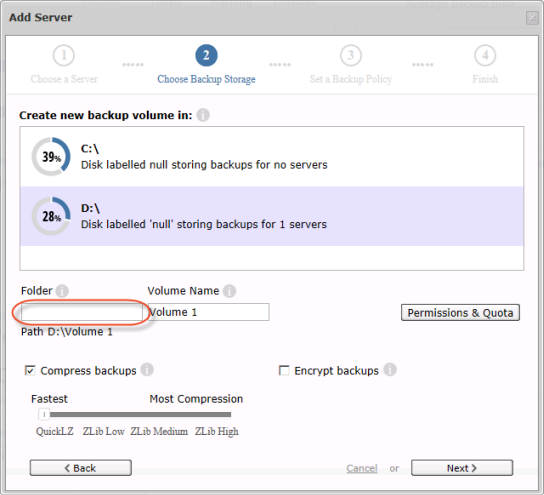
2.1 You can specify a Folder to put the Volume into. For example, if you enter "My_Volumes" as the folder name, the path will be "D:\My_Volumes\Volume 1."
2.2. The Volume Name is assigned automatically. You can change it if necessary.

Configuring Compression and Encryption
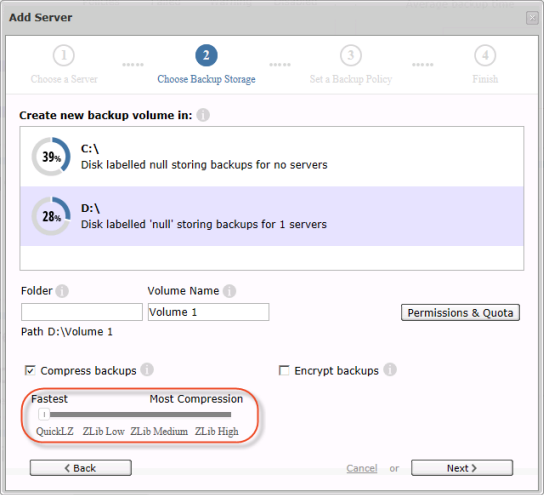
1. Compression is a reduction in data size to save disk space or transmission time.
1.1 By default, the Compress Backups option is enabled. It allows you to use compression.
1.2 Specify the Compression Level using the slider:
- Fastest - This level is used if the most important factor is the amount of time required for the compression operation. In this case, the QuickLZ compression type is used. Read more in QuickLZ compression.
- Most Compression - This level is used if the most important factor is the final size of the compressed file. In this case, the ZLib High compression type is used. Read more in Zlib compression.
| Note Note that the higher the compression level is, the slower your backup process will be. |
2. Encryption allows you to securely protect data that you don't want anyone else to have access to.
2.1 If encryption is necessary, select the Encrypt backups check-box.
2.2 Enter the passphrase and confirm it by entering exactly the same phrase. A passphrase is similar to a password in usage, but is generally longer for added security.
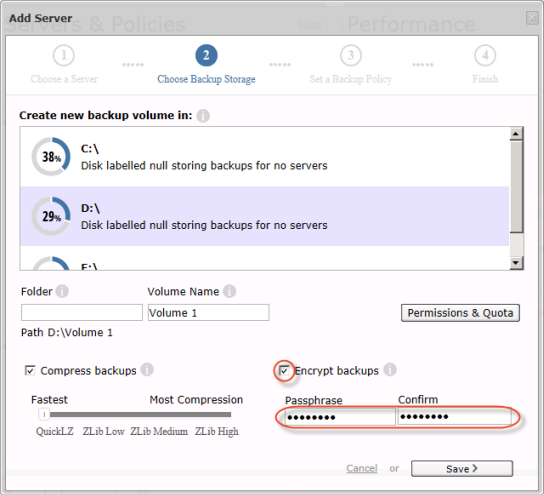
3. Click the Save button.

Specifying Quotas, Adding Users and Groups
Click the Permissions & Quota button to specify quotas and assign users and groups.

1. Quotas are set up to limit the disk usage of the Volume.
1.1 From the the drop-down menu, choose a Quota Type:
- None - This option doesn't allow you to limit the disk usage of your Volume.
- Deltas in Disk Safe - This option ignores the overhead and only considers the size of the data being backed up.
- On Disk Size - This option considers both the size of the data being backed up and the overhead required to store that data.
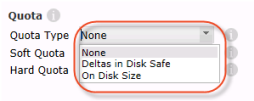
1.2 Then specify the Soft Quota and Hard Quota for the selected Quota Type. Remember that the Hard Quota must be larger than the Soft Quota.
- Soft Quota - This is a warning level that informs users that they are close to reaching their effective limit. The value can be in bytes, KB, MB, GB, or TB.
- Hard Quota - This allows resources to be occupied by data. If the Hard Quota is reached, then the system forbids generation of new Recovery Points. The replication is interrupted and fails. The value can be in bytes, KB, MB, GB, or TB.
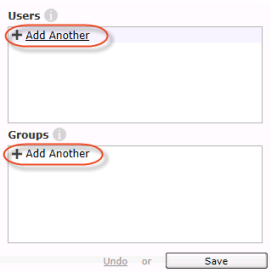
2. By assigning Users/Groups to a Volume, you give them permission to use the resources of that Volume.
2.1 Specify Users and Groups if necessary. To add a User or Group, click the appropriate "Add Another" button.
Tips
|
3. Click the Save button.

Once you have finished configuring the Backup Storage, click the Next button to proceed.
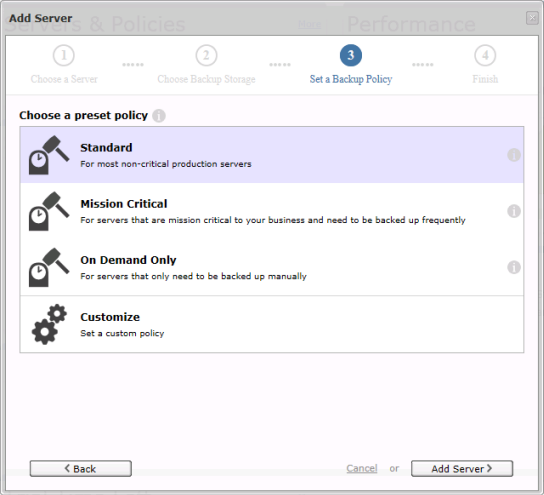
Screen 3 - Set a Backup Policy
In this step, you can choose one of three pre-set policies and also customize your policy.
1. A Policy is a schedule and other settings describing how your Server will be backed up.
1.1 Select one of the following pre-configured Policy Types:
- Standard - Used for most non-critical production Servers. This Policy runs every hour and keeps the 10 most recent Recovery Points.
- Mission Critical - Used for Servers that are mission-critical to your business and need to be backed up frequently. This Policy runs every 10 minutes and keeps the 50 most recent Recovery Points.
- On Demand Only - Used for Servers that only need to be backed up manually. No automatic scheduled backups will be started. This Policy only runs on demand and keeps the 10 most recent Recovery Points.
1.2 If you click "Customize," you will see the following window.
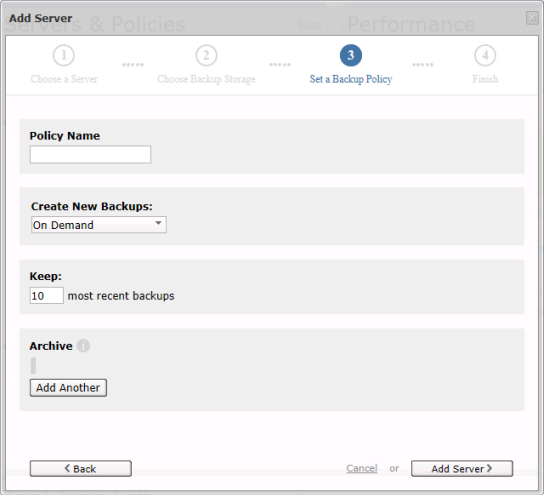
You can define the following options:
- Policy Name - Enter the policy name.
- Create New Backups - Select how often your policy will run from this drop-down menu. The following options are available:
- On Demand
- Minutely
- Hourly
- Daily
- Keep - Enter the number of most recent backups that will be kept.
- Archive - Click the "Add Another" button and define the necessary options to add archiving to your policy. Archiving creates a copy of your most recent backup to be used for long-term data storage. An archived backup won't be deleted as part of the automatic merge process that removes older backups from a Disk Safe.
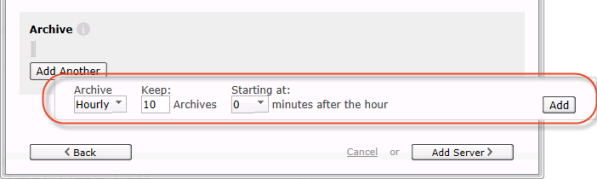
The following options are available:
- Archive - Select from the drop-down menu how often the archiving will be performed. The available options are as follows:
- Hourly
- Daily

Note
If the "Daily" option is selected, click "Choose Hours" and use the check-boxes to select the hours at which you want to start archiving.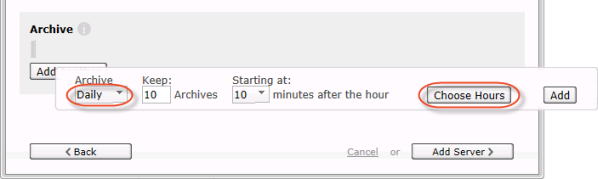
Then click the Add button.
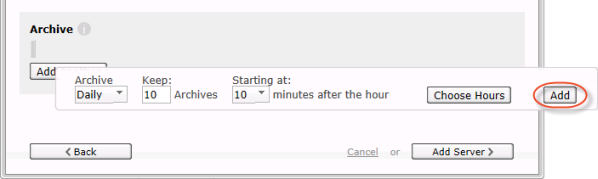
- Keep - This is the number of archives that will be kept. Correct the number if necessary.
- Starting at - Select from the drop-down menu the exact minute from which the archiving will be started.
2. Click the "Add Server" button to proceed.

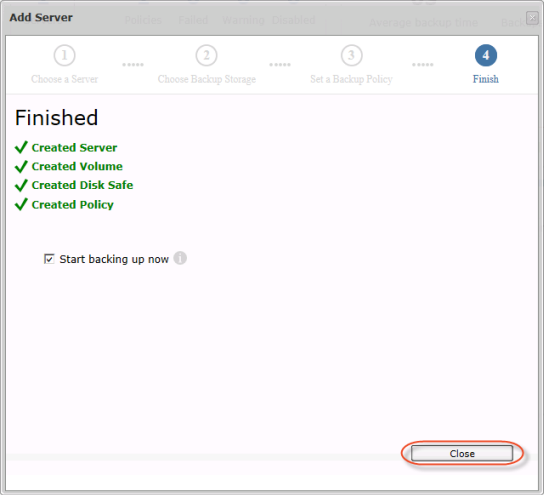
Screen 4 - Finished
After clicking the "Add Server" button, the Volume and/or Disk Safe and Policy for this Server will be created. Then the Backup Agent will be deployed to the Server and the Server will be rebooted (if the option to reboot was selected). This process can take several minutes.
| Tip You can click the “Close” button to interrupt the process while the Volume and/or Disk Safe and Policies are being created, or while the Backup Agent is being deployed. |
Finally, you will see the "Finished" message and the list of created objects. Click the Close button to start your backup process, as you have the "Start backing up now" check-box selected by default.
| Tip You cannot immediately interrupt the backup. If you need to stop the backup:
or
|
Now you can examine the newly created object in the application and edit its properties if needed. Find instructions here: