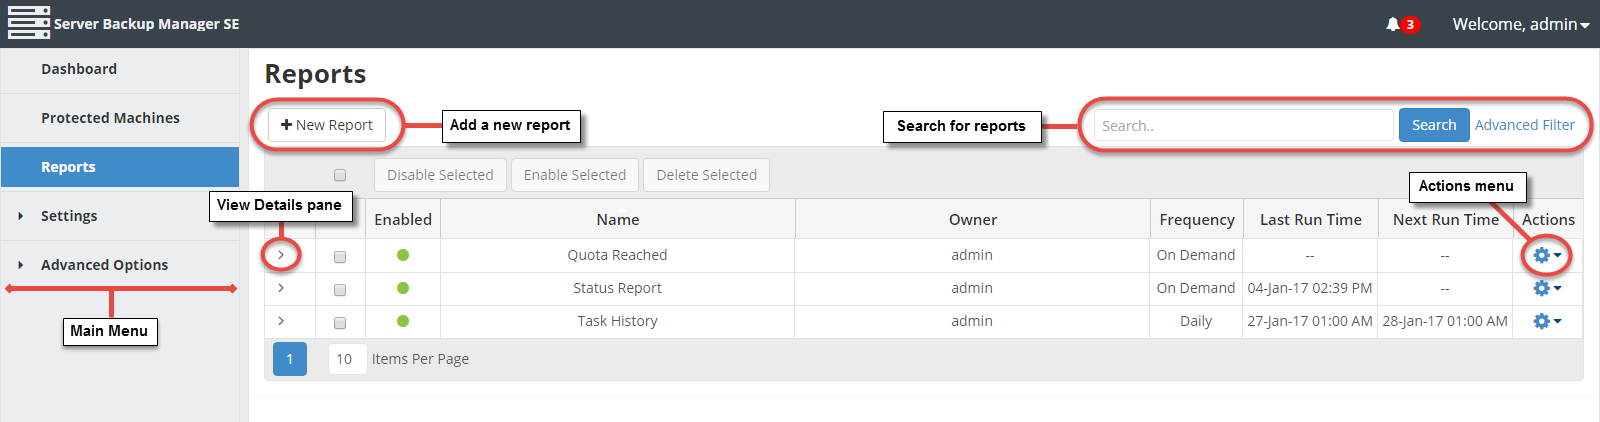
You can access all the functions you need to add and manage reports by clicking Reports in the Main Menu. The Reports page displays. You can also access the Reports screen by manually adding /Reporting/ to the Backup Manager address in the browser address bar. For example, enter http://10.61.200.31/Reporting/. Note that the address is case sensitive.
From the Reports screen, you can:
- Add a new report by clicking the + New Report button.
- Click the Actions icon to display a list of actions that can be completed directly from the Reports screen, such as editing, previewing, or deleting the report.
- Search for specific reports or filter the displayed reports using advanced search criteria.
- View a list of the reports added to the system.
- Click a report's corresponding > icon to access a report summary and report details without leaving the Reports page.
- Use simple, one-step navigation to access other areas of Server Backup Manager from the Main Menu.
Using the Reports page
Several options on this page allow you to:
- Add a report. Add a new report to the system by clicking the + New Report button. When you click this button, the Create New Report window displays, where you can define the report properties. For more information about adding a report, see Schedule email reporting
- Perform a basic search for reports. You can perform a basic search for any of the available reports by entering the search criteria in the Search field and clicking the Search button.
- Apply advanced filters to the Reports list. You can further customize the view of the Reports list and apply all possible advanced filter criteria. For more information about advanced search filters, see Customize the Reports list.
- Clear all filters. Appears only when a filter is in use. To cancel filter settings and show all records in the Reports list, click the Clear Filter button.
Reports list
The Reports list provides information about all of the reports listed in the grid.
Columns:
- Check box - Allows you to select the items in the list.
- Enabled - Graphically indicates the Report status (Enabled or Disabled). If the icon is green, the Report is enabled. The red icon is used for disabled Reports.
- Name - Displays the unique name of the Report.
- Owner - Shows the Report owner.
- Frequency - Shows recurrence selected for running the Report (On Demand, Minutely, Hourly, Daily, Weekly, Monthly, or Yearly).
- Last Run Time - Displays date and time when the Report was generated last time.
- Next Run Time - Displays date and time when the Report will be generated next time according to the schedule.
- Actions - Click this icon to display a list of actions for the corresponding Report:
- Edit Report - Allows you to access the Report properties window in order to change the properties. See Change report properties.
- Delete Report - Permanently removes the Report. See Delete reports.
- Preview - Opens the last generated report in a preview window. See Preview reports.
- Run Now - Generates the Report and sends it to the specified emails. See Generate reports.
- Disable/Enable - Disables or enables the report. The Report will not be generated at the scheduled time. See Disable reports.
List Buttons
The buttons allow work with one or several items selected in the Reports list.
- Select All/Clear All. Click this check box to select all of the reports. Click it again to clear all selected check boxes.
- Disable Selected - This button allows you to disable the selected Reports in the list. See Disable reports.
- Enable Selected - This button allows you to enable the selected Reports.
- Delete Selected - This button allows you to remove the selected Reports from the list. See Delete reports.
Page Navigation
The Page Navigation pane allows you to divide the Reports screen into pages by specifying the desired number of items per page. Various buttons and fields can be used to navigate from one page to another.
- First. Opens the first page.
- Previous. Opens the previous page.
- Next. Opens the next page.
- Last. Opens the last page.
- Items Per Page. Displays the number of items per page that you want to appear in the Reports list. SBM remembers your settings. By default, SBM displays 10 items per page. If you want to see a different number of items per page, type the appropriate number, and then press <Enter>. The maximum number of items per page is 25.
Details pane
Click the > icon of a corresponding report to view the Details pane for the report. 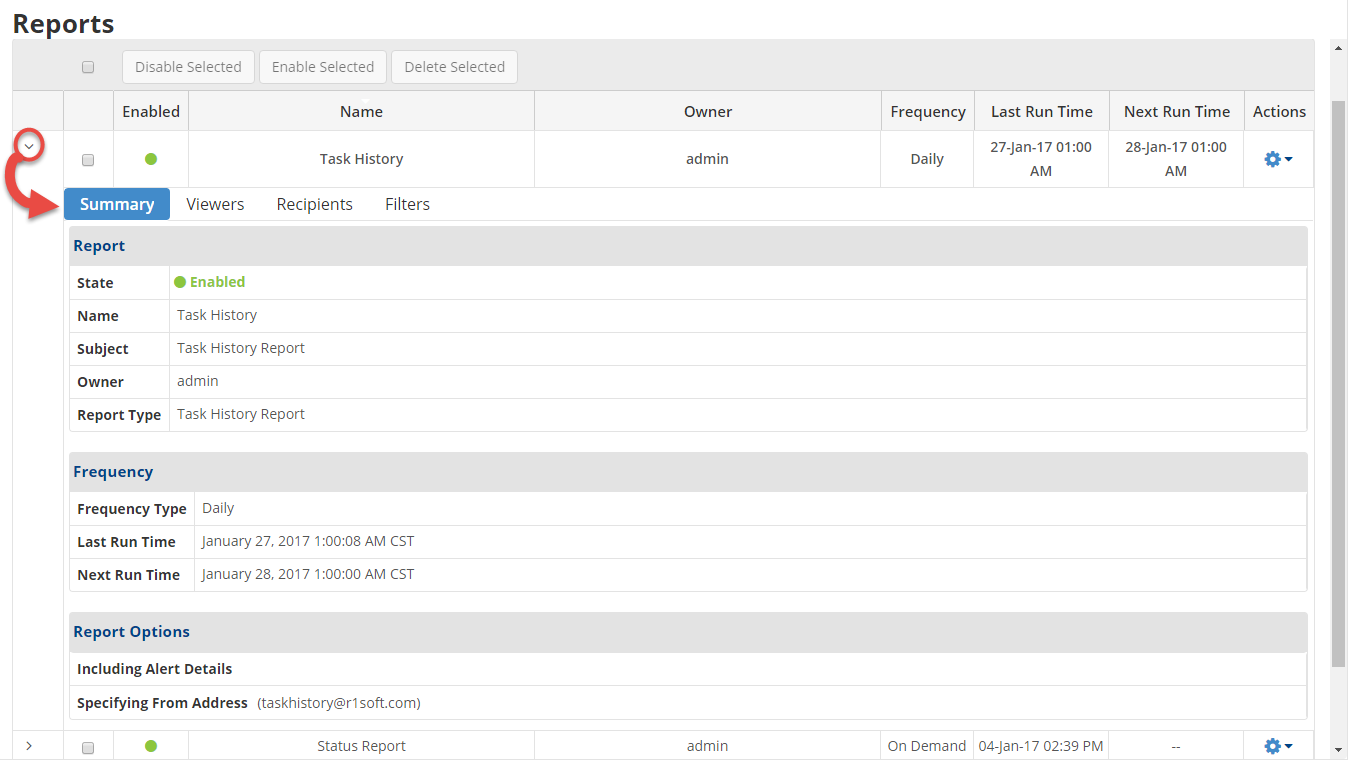
The following tabs can be accessed in the Details pane.
Summary Tab
The Summary tab provides the following blocks of information about the selected report.
Report
- State - Graphically indicates the Report status ("Enabled" or "Disabled"). If the icon is green, the Report is enabled. The red icon is used for disabled Reports.
- Name - Displays the unique name of the Report.
- Subject - Displays the Subject specified in the Report properties.
- Owner - Displays the Report owner.
- Report Type - Displays the report type, such as Task History Report or Status Report.
Frequency
- Frequency Type - Shows recurrence selected for running the Report (On Demand, Minutely, Hourly, Daily, Weekly, Monthly, or Yearly).
- Last Run Time - Displays date and time when the Report was last generated.
- Next Run Time - Displays date and time when the Report will be generated next time.
Report Options
- Including Alert Details - Graphically shows whether the option of "Including Alert Details" is activated for the selected Report. The green icon indicates the enabled option.
- Specifying From Address - Shows the address that is displayed in the From field of the recipient's mail.
Viewers Tab
This tab displays a list of users that can view the report.
Recipients Tab
This tab displays the list of recipients to which the generated Report will be sent.
Filters Tab
This tab displays the Filters applied to the Report. The filters allow you to specify the information which will be included in the generated Report.