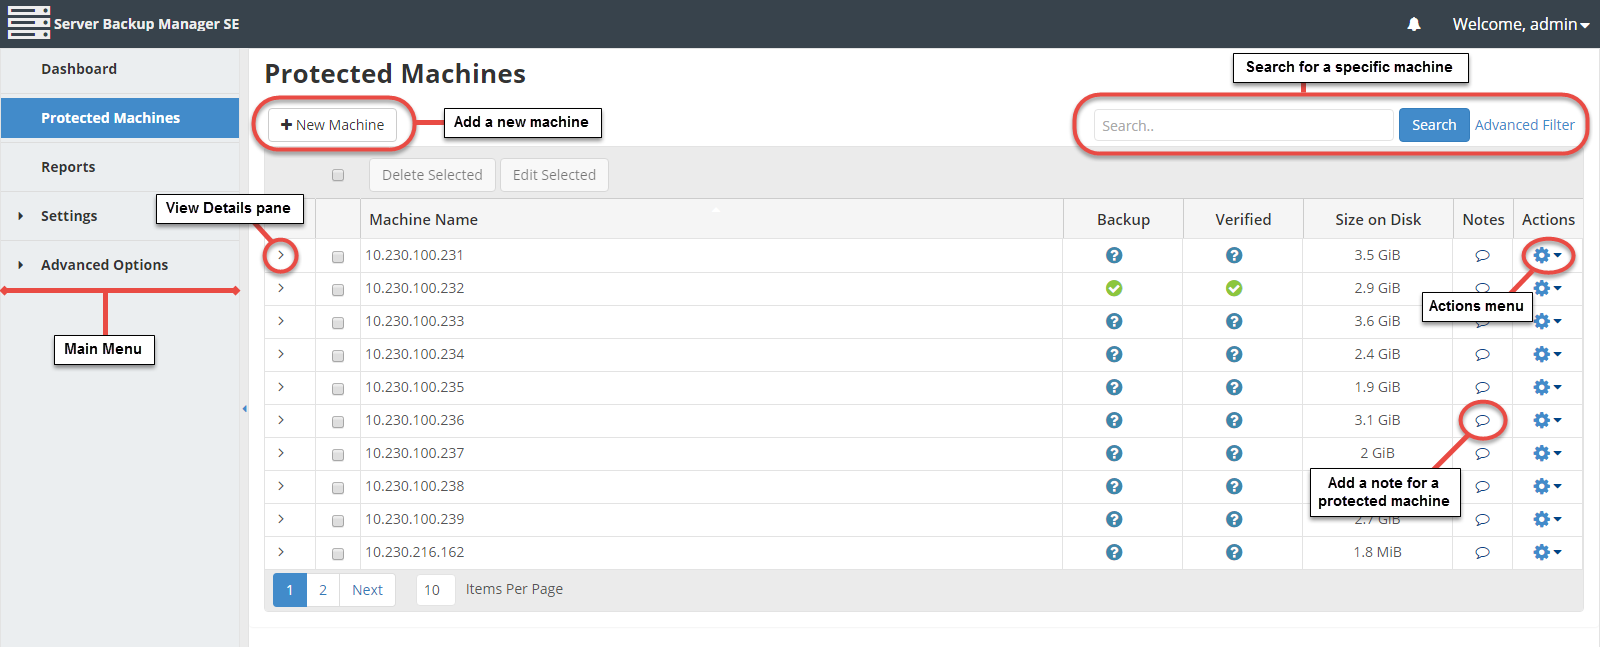
The Protected Machines page in Server Backup Manager allows you to work with the protected machines on which the CDP Agents are installed. You can access all of the functions you need to manage your machines by clicking Protected Machines in the Main menu. You can also access the Protected Machines area directly by adding /Agent/ to the Backup Manager address in your Web browser address bar, such as http://10.61.200.31/Agent/. Note that the address is case sensitive.
From the Protected Machines page, you can:
- Add a protected machine using the + New Machine button.
- Click the Actions icon to display a list of actions that can be completed directly from the Protected Machines screen.
- Search for specific machines or filter the displayed machines using advanced search criteria.
- View a list of the protected machines added to the system.
- Click a machine's corresponding > icon to access additional details for a specific protected machine without leaving the Protected Machines page.
- Record and share notes regarding a protected machine by clicking the corresponding Notes icon.
- Use simple, one-step navigation to access other areas of Server Backup Manager from the Main Menu.
Using the Protected Machines page
Several options on this page allow you to:
- Add a machine. Add a new machine to the system by clicking the + Add Machine button. After adding a machine you can define the machine properties. For more information about defining the machine properties, see Add Protected Machines to Backup Manager.
- Perform a basic search for protected machines. You can perform a basic search for any of the protected machines on your system by entering the search criteria in the Search field and clicking the Search button. For more information about searching for protected machines, see Customize the Protected Machines list.
- Apply advanced filters to the protected machines list. You can further customize the view of the Protected Machines list and apply all possible advanced filter criteria. For more information about advanced search filters, see Customize the Protected Machines list.
- Clear all filters. Appears only when a filter is in use. To cancel filter settings and show all records in the protected machines list, click the Clear Filter button.
Using the Protected Machines list
SBM displays all of the machines in your system in a list on the Protected Machines page. You have the ability to organize information, such as filtering out the items you do not want to view. For more information about the settings available for your protected machine list, see Customize the Protected Machines list.
If you have many protected machines in your Server Backup Manager environment, you can use the paging feature to quickly access specific machines. Use the Prev and Next buttons to page forward and backward, or click the First and Last buttons to jump to the first page or last page. You can also type the number of items you want to view per page in the Items Per Page field, and then press <Enter>. The maximum number of items per page is 25.
Understanding the columns in the Protected Machines list
The following columns display in the protected machines list.
| Column Name |
Description |
|---|---|
| Checkbox |
Allows you to select several protected machines at once. |
| Machine Name |
Displays the unique name of the machine. |
| Backup | Displays the status of the backup on the corresponding machine. A green check mark signifies a successful backup; a red X signifies a failed backup (click the red X for details about the failed backup task). A question mark signifies an issue with the backup task. |
| Verified | Displays whether or not the backup task is verified. |
| Size on Disk | Displays the size on the corresponding disk in bytes. |
| Notes | Click the icon in this column to add a Note about the corresponding machine. |
| Actions | Displays a list of actions that can be taken for this machine. For more information about the Actions menu, refer to [Actions menu - Protected Machines]. |
List buttons
The buttons at the top of the Protected Machines list allow you to work with one or several items selected in the list. You must select the check boxes for the items you want to manage before clicking one of the following buttons:
- Select All/Clear All. Click this check box to select all of the protected machines. Click it again to clear all selected check boxes.
- Delete Selected. Allows you to remove one or more selected machines from the Server Backup Manager.
- Edit Selected. Allows you to edit the properties of one or more selected machines.
Page navigation
The page navigation pane allows you to divide the list of protected machines into pages by specifying the desired number of items per page. Server Backup Manager provides the following buttons and fields to navigate from one page to another.
- First. Opens the first page.
- Previous. Opens the previous page.
- Next. Opens the next page.
- Last. Opens the last page.
- Items Per Page. Displays the number of items per page that you want to appear in the Protected Machines list. SBM remembers your settings. By default, SBM displays 10 items per page. If you want to see a different number of items per page, type the appropriate number, and then press <Enter>. The maximum number of items per page is 25.
Using the Details pane
To view additional details about a specific machine, click the corresponding > icon in the far left column. 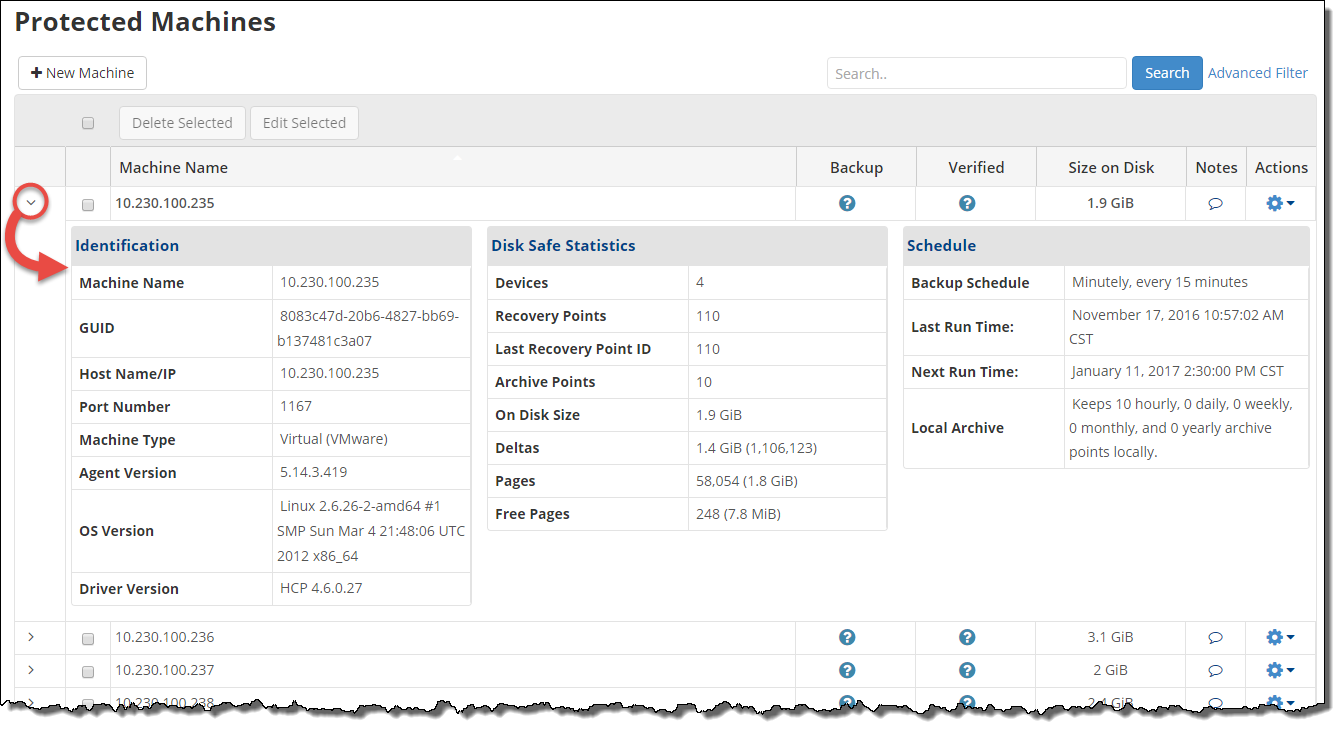
The Details pane provides detailed information about the objects associated with the protected machine. The detailed information displays in the following sections:
Identification
- Machine Name. Displays the unique name used to identify the protected machine.
- GUID. Displays an identification number unique to the machine.
- Host Name/IP. Displays the host name or IP address unique to the machine.
- Port Number. Displays the port number through which the machine listens.
- Machine Type. Displays whether the machine is physical or virtual.
- Agent Version. Displays the Server Backup Manager version available on the machine.
- OS Version. Displays the version of the operating system installed on the machine.
- Driver Version. Displays the version of the driver installed on the machine.
Disk Safe Statistics
- Devices. Displays the total number of devices associated with the selected Disk Safe.
- Recovery Points. Displays the total number of recovery points in the selected Disk Safe.
- Last Recovery Point ID. Displays the recovery ID of the last recovery point in the Disk Safe.
- Archive Points. Displays the total number of archive points associated with the Disk Safe.
- On Disk Size. Displays the total size (GiB) of the associated "on" Disk Safes.
- Deltas. Displays the total size (GiB) of the block-level deltas (the data that has changed since the last backup) associated with the Disk Safe.
- Pages. Displays the total number of Disk Safe pages being used in the on-disk journal file.
- Free Pages. Displays the number of free pages available on the Disk Safe.
Schedule
- Backup Schedule. Displays the backup schedule of the protected machine (such as "Hourly, every 2 hours" or "Minutely, every 15 minutes").
- Last Run Time. Displays the date and time that the most recent backup task was completed.
- Next Run Time. Displays the date and time that the next backup task is scheduled to run.
- Local Archive. Displays the settings of the local archive (how many archive points are kept).
Actions icon
Click the Actions icon on the Protected Machines screen to display a list of actions that can be taken for a specific protected machine.
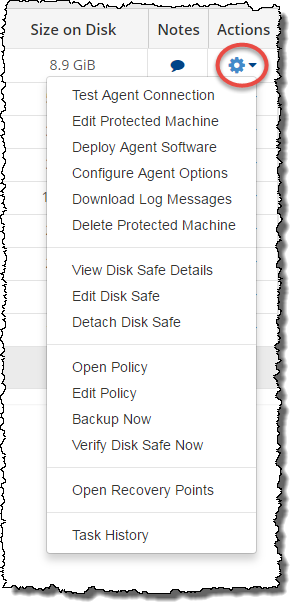
Select one of the following options:
Test Agent Connection. Select this option to check the connection between the CDP Agent and the Backup Manager. For more information, click here.
Edit Protected Machine. After a protected machine has been added, you can make changes to the machine by selecting the Edit Protected Machine option. The Edit Protected Machine window will display when you select this option. For more information, click here.
Deploy Agent Software. Select this option to install the Backup Agent software and authorize the current Backup Manager. For more information about deploying an agent, click here.
Configure Agent Options. Select this option to display the Configure Agent Options window, where you can manage configuration options for the Backup Agent. For more information, click here.
Download Log Messages. Select this option to download and save log messages for a protected machine to your local PC. For more information about downloading log messages, click here.
Delete Protected Machine. Select this option to delete the protected machine. A window displays where the deletion can be confirmed. For more information about how to delete a protected machine, click here.
View Disk Safe Details. Select this option to view the details for the Disk Safe attached to the corresponding protected machine. The Disk Safe Details window displays. For more information about viewing the Disk Safe details, click here.
Edit Disk Safe. Select this option to edit the Disk Safe attached to the corresponding protected machine. The Edit Disk Safe window displays. For more information about editing a Disk Safe, click here.
Detach Disk Safe. Select this option to detach a Disk Safe from the protected machine. All configured tasks and historical task information will be lost, but the Disk Safe and all data backed up will remain on disk. For more information about detaching a Disk Safe, click here.
Open Policy. Select this option to view the details of the policy attached to the protected machine. The Policy Details window displays. For more information about a policy's details, click here.
Edit Policy. Select this option to edit the policy attached to the protected machine. The Edit Policy window displays, where you can edit the policy. For more information, click here.
Backup Now. Select this option to perform an on-demand backup. The backup task will begin immediately, and a details window displays the backup progress. For more information, click here.
Verify Disk Safe Now. Select this option to verify the Disk Safe immediately. For more information about Disk Safe verification, click here.
Open Recovery Points. Select this option to open the Recovery Points window, where all recovery points for the corresponding protected machine are listed. For more information about accessing recovery points, click here.
Task History. Select this option to access the Task History of the corresponding protected machine. For more information about Task History, click here.
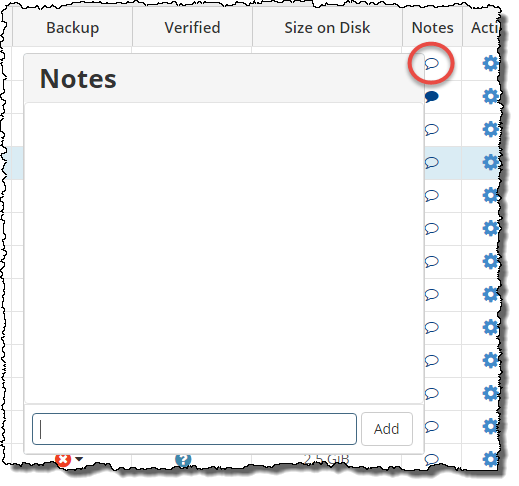
Notes icon
Click the Notes icon on the Protected Machines screen to add and share a note regarding a specific protected machine. This note can be seen by all users who can view the protected machine.
 .
.
Simply enter your note for the protected machine in the space provided and click the Add button. The Notes icon will then appear filled in, indicating that there is a note for the protected machine.